Monday, December 19, 2011

Quick Christmas Treats for Friends

Last week Rosie and I were discussing what little treats we could give to her class for Christmas this year.
Last year we made little gift bags and baked some Christmas cookies, however this year we were running short on time and needed a quicker solution.
We decided to make mini bags of M&M's for each class member and we were able to make them up one evening after dinner, in just a few minutes.
These gorgeous tags are from A Little Delightful and can be used in so many ways. We used our circular scallop punch to cut them out and then used double sided tape to attach them to some simple cellophane bags we found at Spotlight.
We found the large tubs of M&M's at KMart but unfortunately they didn't have the Christmas coloured ones this year so we had to settle for the regular kind. We sealed the bags with a Christmas sticker at the back and they were done!
This is a great easy project to do with littlies and we really enjoyed making these up and giving them to friends. Happy Christmas!

Saturday, December 17, 2011

Delicious Christmas Cake Recipe

Making my own Christmas cake is something I have always wanted to do, but never attempted...until recently! Taff and I love Christmas cake but we usually leave it to my mum to make, as she does a very yummy one. I was talking to a co-worker a few weeks ago who said that she was planning to make her Christmas cake that weekend, so I asked if she could bring me in her recipe.
 I gathered together all my ingredients one afternoon and gave it a go and it was so satisfying to finally be making my own cake! This recipe is fantastic as it doesn't have to be prepared months, or even weeks in advance. It is able to be made and eaten immediately, or you can make and store it just as you would a traditional Christmas cake. Either way, it is delicious!
Belinda Jeffery's Last Minute Christmas Cake
300 grams unsalted butter, chopped
420 grams raw sugar
380 grams raisins
180 grams pitted prunes
160 grams sultanas
90 grams currants
90 grams piited dried dates
2 tsp baking soda
1/2 cup (125 ml) brandy or rum (I used orange juice!)
2 tsp nutmeg
2 tsp cinnamon
4 eggs, lightly beaten
2 1/2 cups (400 grams) wholemeal plain flour (I used plain white flour)
100 grams pecan halves and 50 grams raw almonds to decorate (optional)
Melt butter in a pan large enough to fit all ingredients. Add the sugar amd stir for 1-2 minutes to partially dissolve. Add the fruit, soda, brandy (or juice!) and 1 1/2 cups (325ml) water. Increase heat to medium and simmer for 4 minutes. Turn off the heat and cool to room temperature in pan. Preheat the oven to 150 degrees celcius (fan forced). Grease 23cm springform pan and line with buttered baking paper.

Stir in nutmeg, cinnamon and eggs into the fruit mixture. Mix in flour and stand for a few minutes. Pour into pan and level the top. If using nuts, make a single ring around the edges or cover top in concentric circles. Bake for 2 hours 30 minutes or until cake feels firm in the middle and a skewer comes out clean. (After an hour or so, check the top; if it's a good rich brown, cover loosely with foil). Cool cake completely in pan, then remove and store in an airtight container for immediate consumption, or in plastic wrap, foil or newspaper for longer term storage.

Thursday, December 15, 2011

Festive Craft: Christmas Memory Match Game

Another festive game my two littlies are enjoying is this Christmas Memory Match, found over at Simple As That.
Again, it is quick to prepare and once you have, you can store it away for many Decembers to come. They love to play this with us and it can be used from a very young age, with Mum or Dad's help.
The hardest part (which isn't hard at all!) is preparing the cards. Once you print them out, all you need to do is mount them on card and then you can laminate them for extra durability if you wish.
I found out the hard way that mounting them on card was a neccessary step after an eagle eyed Miss 7 was caught cheating! It turns out the cards are quite transparent on regular copy paper. :)
It is a very simple game and once cut out, takes next to no room to store. Give it a try!

Tuesday, December 13, 2011

Christmas Craft Activity: Santa's Beard

I know it is quite late to be sharing this Christmas craft but it is such a cute little idea that I figure it is better late than never. :)
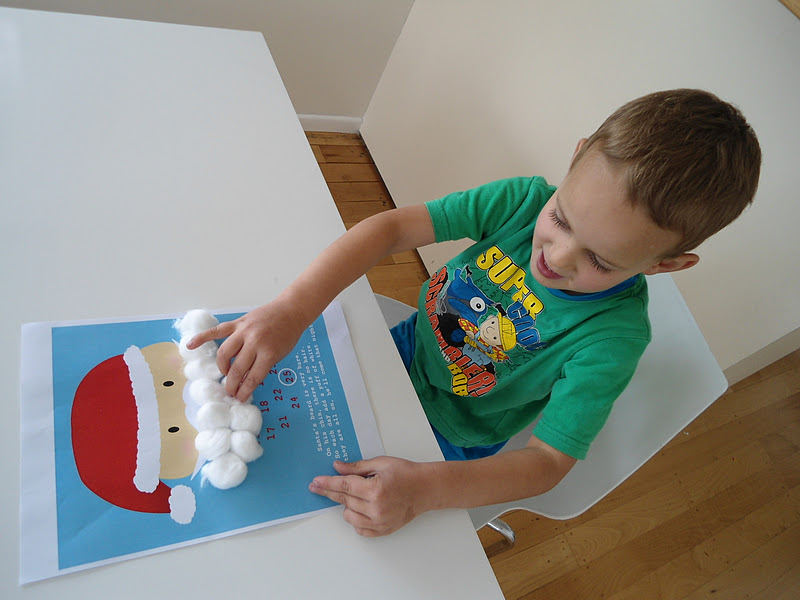
I was browsing Pinterest for craft ideas and found this gorgeous little Santa countdown activity here. It takes only a couple of minutes to organise and my little ones are loving it.
All you need is a colour printer, some fluffy white cotton balls and some glue (we use PVA). There is a cute poem which we read through each day and then you glue a single cotton ball to the chart as each day passes.
Once Santa's beard is complete, you know the time has come for him to visit (provided you are on the good list, of course!). This is a great visual activity for preschoolers who can't read numbers as they can easily see Santa's beard filling up and get very excited about it.
Hope your little cherubs enjoy it as much as mine do! :)

Sunday, December 11, 2011

Kids Summer Bedroom Update: Part Two

Here are a few more snaps of Rosie and Harry's summer bedroom update. :)
A few months ago I got these cute little bird houses from Charlotte and Austen. They come in pink, blue and green. They add a touch of whimsy to the room and tie in with the bedding really well.
My favourite things in the room are the cushions...
the bunting...
and the blue and white striped rug which also helps to tie everything together.
One of the biggest jobs to tackle in the room was the merging of the contents of two sets of drawers and two wardrobes.
This took quite some time to do, but it was a great opportunity to go through everything and make a pile for the clothing bins!

The kids were so excited to see their new space and all the work we put into it that weekend was worth it when we saw how chuffed they were.
It is onwards and upwards now and the next project to tackle is a unisex nursery for the new little one!

Thursday, December 8, 2011

Kids Summer Bedroom Update: Part One

I have been meaning to share this little room update for a few weeks now and have finally got around to blogging it! With the impending arrival of a new baby in a few months, we needed to evaluate how we use the bedrooms in our house.
We have three bedrooms upstairs and two downstairs...BUT our children are still too young to be so far away from us and really need to be close to us. Our house layout is perfect for teenagers but we are a few years off that so in the meantime, there will be sharing. :)
Harry and Rosie's previous bedroom was in the smallest and warmest room in the house. It is a lovely room but gets super hot during summer and they have had some trouble getting to sleep in there in the past. It is fantastic in winter though! We decided that this would make the best room for the nursery so set about the mammoth task of moving the bunks and everything else to their new room.
I am very single minded when I approach jobs like this and will literally not rest until it is finished. This usually means I am still working away in the late hours of the night to get it all done. We decided to prepare the new room as a surprise for Rosie and Harry while they were staying with their grandparents for the weekend. It is too difficult to tackle such a big job with little ones around!
A few months ago I got Taff to bring back some Ikea Fabler Resa duvet sets from the UK as I thought they would be great for a summer bedroom and suitable for girls or boys. They are very light and fresh looking and I love them! They were also very cheap, even better. :)
The duvets were the only things we purchased new for the room. Everything else we repurposed from their olds rooms and other parts of the house. I made Harry's bottom bunk more boyish with his red star and stripe cushions and his blue 'H' block art (I made this myself) at the top of his headboard.
I tried to make Rosie's top bunk more girly with some pink pillowcases and cushions. I also strung up her bunting that I made from Cath Kidston fabric a couple of years ago. It is always satisfying creating a new look for very little money and I really enjoy little projects like this. :)

Tuesday, December 6, 2011

Project Life Tuesday: Sad Parenting Moments

Project Life Tuesday for today is sad moments in parenting. I know that there will be many times when my children are hurt, but when they are, it breaks my heart! I picked up Harry from preschool recently and found this bruise under his eye. It turned out he had been kicked in the face by a "friend"...on purpose.
I was so upset and my distress was even greater in the morning when his bruise became ten times worse. I just wanted to bundle him up in cotton wool and keep him by my side so he could never experience any hurt again. The funny thing was that Harry himself was already over it and assured me he was fine and that it only hurt "when he pushed it hard". He continues to play with his friend every day and all is forgotten. I probably need to take a leaf out of my four year old's book!
Challenge for Project Lifers: Take a snapshot of your child's next bruise or scrape. It does feel very strange to do so but every bump tells a story. :)

Thursday, December 1, 2011

December Fun: Letters to Santa

Can you believe that December has rolled around so quickly? "Old people" used to tell me that the years go faster as you get older. They were so right!
With the arrival of December comes all the fun that comes with it. We decided to start with our letters to Santa. After all, it is important to give Santa as much notice as possible for these things! :)
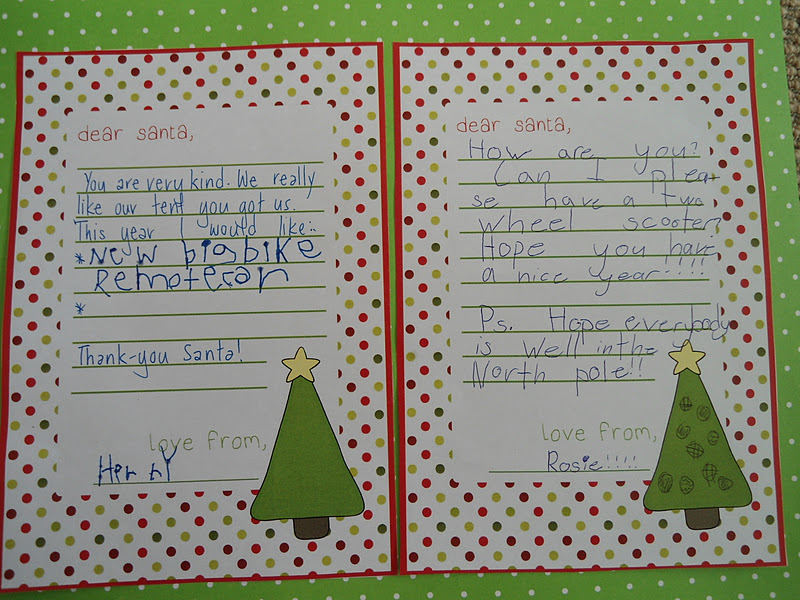
I found these fantastic Santa Letter printables at one of my favourite blogs, A Little Delightful. The talented Bianca creates the most amazing things for her blog readers and I highly recommend you stop by for a look when you have a spare moment. 
Rosie and Harry drafted their letters first and then we set about writing them on these gorgeous templates. They had so much fun doing this and are looking forward to sending these off to Santa.
Of course, I want to keep these gorgeous letters for our family album so Santa will have to settle for a photocopy of them instead. What activities do you have planned for the coming weeks?

Tuesday, November 29, 2011

Project Life Tuesday: Quotes

Project Life Tuesday for today is favourite quotes. Do you have one that you particularly love? For me, it is this one...
I found this quote on Becky Higgin's beautiful blog and if there is a quote that sums me up perfectly, this is it. I LOVE being at home and there is no where else I would rather be. I would choose an evening or weekend at home over any any other outing. This seems to be a family trait (on my side!) and one which has lasted for generations. I am happiest at home and look forward to walking in the door each afternoon after a long day at work...it is my favourite time of day.
To remind me of this, I just had to frame this great quote from Jane Austen, which makes me smile whenever I see it. You can download it here for free from Becky's blog.
Challenge for Project Lifers: Is there is a quote that sums you up?

Thursday, November 24, 2011

Holiday Fun at Butterfly Creek

A few weeks ago we headed to Butterfly Creek, an animal park in South Auckland.
It has been quite a while since we last went so it was great to see the new crocodile and bug section.
Rosie and Harry were able to pat the new spring lambs and have a hold of the rabbits and guinea pigs.
They were even able to feed the baby goat a bottle! They have heard me share stories of how I would feed my pet lamb Josie each day.
I have always felt lucky to have had that time living on the farm and one of the sad things about living in the city is a lack of these opportunities for my own kids.
The Butterfly House was also great and they loved having the butterflies landing all around them. You can see from the foggy photo how hot and steamy it was in there!
I would recommend Butterfly Creek for all ages and my kids really enjoyed it. They are looking forward to visiting again soon.

Tuesday, November 22, 2011

Project Life Tuesday: Magazine Inspiration

Do you have a favourite magazine that really inspires you? I have several that I love but have recently cut down and allowed myself only one each month...usually Your Home and Garden. It arrives in my letterbox mid month on a Friday and there is much happiness when I see it! I LOVE seeing what other people are doing in their homes and even though not all the interior styling is to my taste, I can appreciate it for what it is and glean inspiration for our own home redecoration process.
This snapshot was from a recent issue and I absolutely loved this house. I really want some of that circular art!
Challenge for Project Lifers: Do you have a favourite magazine that inspires you to take action and recreate something magical in your own home?

Thursday, November 17, 2011

Chocolate Weetbix Crunch

There are times when you NEED something sweet and you need it FAST! This is my 'go to' recipe when I am feeling my family are feeling like a quick sweet treat. :)
Chocolate Weetbix Crunch (Microwave)
100 grams butter
1 Tb golden syrup
1 cup white flour
1 tsp baking powder
2 Tb cocoa
1/2 cup coconut
1/2 cup brown sugar
1/2 cup crushed weetbix (approx 2 biscuits)

Melt butter and golden syrup in a mixing bowl at 50% power for 1 minute and 30 seconds. Stir until melted and add remaining ingredients. Press into an oblong dish (I use a glass Pyrex one) approximately 27cm x 17cm and cook at 70% for 5 minutes.
Mark into squares and cut while hot.
Sprinkle with icing sugar or chocolate icing when cool.
I am the type of person that hates to waste anything so I make this recipe when we get to the bottom of a Weetbix box. It is perfect for using up all the "crumbs" in the bag and is a great lunchbox filler which you can whip up in no time. :)

Tuesday, November 15, 2011

Project Life Tuesday: Tools of the Trade

Project Life Tuesday is tools of the trade. :) If you are a regular reader you will know that I have a bit of thing with washing. I love to do it, I love to fold it, BUT I hate putting it away!
To make the whole washing process a little easier I picked up some washing baskets that bring a smile to my face. These are my two favourites of the four that I own. Yes, we have a lot of washing and that is only going to increase with another little one on the way. :)
Challenge for Project Lifers: What are your tools of the trade that make running your household a little easier?

Tuesday, November 8, 2011

Project Life Tuesday: Favourite Places

Project Life Tuesday for today is favourite places. Do you have a favourite place in your house? One of our favourites is Rosie and Harry's bookcase in their bedroom. They both love books and are very lucky to have regularly received books as gifts from family overseas. They also love trips to the library and this is becoming a Saturday afternoon outing with Taff. They are slowly building up their collection and really enjoy revisiting old favourites.
They spend a lot of time choosing books from here and it is most definitely a favourite spot.
Challenge for Project Lifers: Take a photo of a favourite spot/nook/corner in  your house. :)

Thursday, November 3, 2011

Bagging a Bargain

Don't you just love a bargain?
I picked up these striped lamp shades in the clearance section at K-Mart for $1 each a few months ago and have finally got around to using them. They are actually from the kids section but I thought they would be equally nice in our guest room.
I went "shopping" in our garage for a couple of old Freedom lamps that we got many years ago and after ditching the old shades which had turned an unsightly pale yellow, I put my new $1 shades on.
The old lamps now have a new life ahead of them and were cheap as chips! I have a thing for stripes at the moment...and navy blue. :)

Tuesday, November 1, 2011

Project Life Tuesday: Paint Accidents

Project Life Tuesday for today is when painting fun goes awry. I picked up Harry from preschool the other day and went to give him a little kiss on his head...and saw this!
Simple, I thought. A quick wash and it will come out easily. It didn't. We are now up to several days later and four hair washes and there is still red paint in there. It will have to grow out at this rate! Every time I see his little red head I think about the fun he must have had at preschool that day...and smile.
Challenge for Project Lifers: Take a photo of a little accident that has taken place with your little one lately. :)