Showing posts with label Craft. Show all posts

Friday, August 24, 2012

Tea Towel Cushions

Now that little Elliot has moved himself to a 4 hourly feeding routine, I am getting a bit more time to work on a few projects around the house, which I am really enjoying!
This week I found these two great cotton tea towels from Bed, Bath and Table. I loved the bright colours on the plain white background and I thought they would be great to add a bit of colour to Rosie's bed.
Best of all, tea towels are MUCH cheaper than buying fabric by the metre and given our limited budget and my passion for updating our cushions more often than needed, this was a great option.
For several years now, I have seen lots of people make cushions out of tea towels in all my favourite home magazines. I always planned to do it myself, but never seemed to have the time to really look around for some that I liked.
I am increasingly finding myself drawn to bright colours lately, but am too scared to commit to anything permanent, like painting walls in bright colours! Instead I am trying to add more 'pops' of colour around the house instead.
If you are planning on making tea towel cushions (or any cushions for that matter), I strongly recommend you prewash the fabric first. This was a tip I learned from my sewing guru, Karen and she was right. The finish is far better when the fabric has been washed as often shrinkage occurs, especially in cotton.
I pulled out my sewing machines on a beautiful sunny afternoon during Elliot's sleep, and whipped these up before the afternoon school pick up. Every time I make something on my machines, I am filled with such a sense of satisfaction at creating something, that I wonder why I don't do it more often.
I made the triangle bunting tea towel into a small rectangular cushion by folding it in half and adding a zip. I wanted a standard square cushion out of the leaf fabric, so had to use some plain linen fabric I already had for the back.
Rosie was thrilled with them when she saw them and I am already on the search for more tea towels... :)

Sunday, April 8, 2012

Nursery Progress: Driftwood Mini Hanging Wardrobe

One of the challenges of creating a gender neutral nursery has been finding the motivation to tackle some of the projects I had in mind for the room. I really enjoy hunting for bedding and special touches for a specific gender and in the absence of this knowledge, I have held off committing to anything other than plain white and grey, which I admit is rather boring.
Our driftwood hanger.
A few months ago I was browsing one of my favourite blogs, The Happy Home and came across an idea I fell in love with. The talented Belinda had created a super cute driftwood hanger to hang her new baby's clothes from and I vowed to keep an eye out for something similar on our next trip to the beach.
Fiddling with fishing line to get the height just right.
When we visted Rangitoto Island as a family after Christmas, we found a few pieces of driftwood that we popped into our backpacks and then promptly forgot about for a few months.
Voila! Driftwood hanger complete.
A couple of days ago we finally got around to this little project (the nesting instinct has now kicked in!) and my patient husband was super obliging and hung my driftwood hanger for me. Isn't it cute?
Cube storage
The best thing about this little DIY project is that it costs virtually nothing! We just used fishing line and a couple of little screw in metal eyelets in the ceiling. I wouldn't like to hang anything too heavy on it, but it is perfect for baby clothes. :)
Belinda's nursery picture that inspired me so many months ago.

Monday, December 19, 2011

Quick Christmas Treats for Friends

Last week Rosie and I were discussing what little treats we could give to her class for Christmas this year.
Last year we made little gift bags and baked some Christmas cookies, however this year we were running short on time and needed a quicker solution.
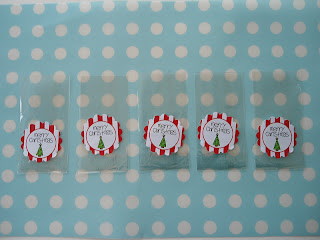
We decided to make mini bags of M&M's for each class member and we were able to make them up one evening after dinner, in just a few minutes.
These gorgeous tags are from A Little Delightful and can be used in so many ways. We used our circular scallop punch to cut them out and then used double sided tape to attach them to some simple cellophane bags we found at Spotlight.
We found the large tubs of M&M's at KMart but unfortunately they didn't have the Christmas coloured ones this year so we had to settle for the regular kind. We sealed the bags with a Christmas sticker at the back and they were done!
This is a great easy project to do with littlies and we really enjoyed making these up and giving them to friends. Happy Christmas!

Thursday, December 15, 2011

Festive Craft: Christmas Memory Match Game

Another festive game my two littlies are enjoying is this Christmas Memory Match, found over at Simple As That.
Again, it is quick to prepare and once you have, you can store it away for many Decembers to come. They love to play this with us and it can be used from a very young age, with Mum or Dad's help.
The hardest part (which isn't hard at all!) is preparing the cards. Once you print them out, all you need to do is mount them on card and then you can laminate them for extra durability if you wish.
I found out the hard way that mounting them on card was a neccessary step after an eagle eyed Miss 7 was caught cheating! It turns out the cards are quite transparent on regular copy paper. :)
It is a very simple game and once cut out, takes next to no room to store. Give it a try!

Tuesday, December 13, 2011

Christmas Craft Activity: Santa's Beard

I know it is quite late to be sharing this Christmas craft but it is such a cute little idea that I figure it is better late than never. :)
I was browsing Pinterest for craft ideas and found this gorgeous little Santa countdown activity here. It takes only a couple of minutes to organise and my little ones are loving it.
All you need is a colour printer, some fluffy white cotton balls and some glue (we use PVA). There is a cute poem which we read through each day and then you glue a single cotton ball to the chart as each day passes.
Once Santa's beard is complete, you know the time has come for him to visit (provided you are on the good list, of course!). This is a great visual activity for preschoolers who can't read numbers as they can easily see Santa's beard filling up and get very excited about it.
Hope your little cherubs enjoy it as much as mine do! :)

Tuesday, June 28, 2011

Project Life Tuesday: Cupcakes

Project Life Tuesday today is cupcakes...
My beautiful friend Heidi invited me to join her at The Homestore in Milford for a couple of cupcake decorating sessions and wow, such fun! I am a complete novice at this type of thing and my cupcakes were far from perfect but I was actually still proud of them, flaws and all! lol
Challenge for Project Lifers: Take a snapshot of a new hobby you have tried. 

Monday, January 17, 2011

Craft Totes

Since starting Project Life I have been looking for a suitable way to store my large album, journaling cards and other craft paraphernalia. A couple of weeks ago I found a solution that I thought might work for me...these cute craft totes from Grant Studios.


I got a couple of them for a bargain price (long story) and they are a great size for scrapbooking albums and have an extra pocket for my stamp pad, pens, etc.
By having my supplies organised and close at hand, it makes it a lot easier for me to grab my craft tote when I have a spare moment and catch up on my journaling.

Sunday, December 12, 2010

DIY Christmas Reindeer

Ok, so you don't get much easier than this for my rustic looking Christmas reindeer. :)
As you know from my previous posts, I love the natural finish on these decorations and was lucky enough to find three of these cute little guys at Spotlight a few weeks ago.
They are designed to be painted and embellished to your own tastes, but my tastes dictate that they must stay in their raw state.
All I did was tie a red gingham ribbon bow around their necks and I love them just as they are. :)

Wednesday, December 8, 2010

Christmas Craft: Bunting

Another simple craft project I did for our mini tree was some Christmas bunting.
I LOVE bunting!
There is something about seeing a row of flags in gorgeous fabrics that I just love.
I didn't want to go to any expense with this project so I just used what I found in my stash. I found some pale blue gingham and some red check Ikea fabric which I had left over from making some pillowcases for Rosie and Harry.
I had run out of white cotton tape but I found some printed tape which I had saved from a gift and this was fine. I just flipped it over to the plain side! Gosh I love being sustainable and reusing things, there is such satisfation in giving something a new life.
I decided to go for the lazy option and didn't even sew my flags, I simply cut them out with my pinking shears. What could be easier? After that I pinned them onto the gift tape and sewed a straight stitch across...easy!
They are now draped across Rosie and Harry's tree and are a great alternative to the traditional tinsel. :)

Tuesday, December 7, 2010

Christmas Craft: Doily Snowflakes

Do you have a stash of paper doilies that you don't know what to do with?
I found a tutorial for a great way to put these to good use...as Christmas snowflakes!
Belinda over at The Happy Home Blog is a former editor of Real Living magazine and is super talented when it comes to projects such as these. You can check out her instructions for these gorgeous snowflakes here.
I am not usually a paper doily kind of girl so I had to visit my local $2 Shop to find these. I am pretty sure you can also find them at most supermarkets.
The thing I love most about these, apart from the fact that they are a cinch to make, is that you can use them however you like. I had grand plans to hand sew decorations for Rosie and Harry's tree but in the end, these were a simpler option.
I decided to use them as tree decorations. I used one of the large ones as the tree topper and have some smaller ones resting on the branches below. I love them and may even make a few more next year to place on our walls. :)
Tomorrow I will be sharing the Christmas bunting on our mini tree. :)

Friday, October 29, 2010

Halloween Decorating

I have never decorated our house for Halloween before but this year Rosie and I thought we might do something very small to get the house ready for Halloween.
We found this great bat template over at Country Living and this afternoon we made a few bats from some black card to stick on our walls.
We traced the template onto some sturdy card to make it more robust and then Rosie drew around it on the folded black paper.
It only took a few minutes to make several bats so it was an easy craft activity to do while dinner was cooking.
All was going well until...
I heard Rosie shout out, "What happened with this?" It seems that something went wrong with cutting out this particular bat so we had a good laugh about this strangely shaped one.
Now our lounge walls are graced with these gorgeous bats and we are set for our Halloween weekend. :-)