Showing posts with label Gladstone Renovation. Show all posts

Thursday, October 4, 2012

Operation Basement Begins...

This poor area of our house has been neglected and in a state of limbo for almost two years. Throughout this time it has mainly been used as a dumping ground storage area for pretty much everything that we couldn't fit upstairs.
Carpet scraps down on the bare concrete...oh dear.
This included everything from unused furniture, building supplies, exercise equipment, out of season clothing, excess bedding, craft supplies, my fabric stash, toys, Christmas decorations and so much more.
This was a built in sink in this "hobby room".
Although it was fantastic having such a large area for storage, we knew that eventually we wanted to make it into a useable space with a spare room and possibly an office area...but there was a problem.
It even had real hot water...until we got the plumber to remove it.
A. Big. Problem.
Not that long after we moved in, we suffered a small leak downstairs which caused a damp patch to the carpet in one of the rooms. Fast forward a few months and there were more leaks and finally, a huge flood throughout the entire downstairs area! The flood occured after my DIY husband decided to "fix" some spouting outside.
Goodbye built in sink and cupboard.
To be fair, what he did "should" have worked theoretically, however something happened and all the rainwater was directed to a place it shouldn't have gone (don't ask me where as I don't know!). Right then and there we decided to rip up all the carpet and there began the long process of identifying the source of the problem and putting in measures to fix it.
Hello study nook in Rosie's new room. Here she is measuring up for a desk.
The first thing we did was get new drainage laid around the outside of the house, to ensure all the water was draining away where it should be. This was a long but essential process and unfortunately our front yard was pretty much destroyed during the process.
One of the only pictures we have of the ivy before it was taken out.
As you can see from all the trees in the foreground, this was taken during a tree felling exercise. :)
 
 Saddest of all, all the decorative ivy which was growing on the lower level of the house for decades, had to be cut away to access the sides of the house. I was gutted as it was a feature I really loved, and what little street appeal our 1970's house had, was lost. :(
The good news is that the drainage seems to be doing it's job and in the 12 months+ we have had it, no more floods! You would think that would be the end of it...but no.
The previous ower clearly loved nails. Look how many he used!
This downstairs area was converted into two extra bedrooms, a study and bathroom over 25 years ago and although it was done properly, some of the waterproofing measures were nearing the end of their life. This meant that occasionally we had small areas of damp forming in the concrete. Ironically, this always seemed to happen in the summer after heavy rain! We knew that we would have to address this before even thinking of moving on with any projects down here.
This is the largest room downstairs...hopefully a spare room for visitors.
So a few weeks ago we cleared the whole area out (you can't move in our garage at the moment) and Operation Basement was moving forward! Yay! Some of the skirtings were ripped up, ugly built in units were ripped out and the builder has been in to build a false wall for us and repair some of the holes in our roof where we had all our plumbing replaced. Yes, it turns out our house was from the era of faulty Dux Quest Piping.
Rosie is planning to move to her new room down here.
We really had no choice but to replace the piping in the house as there was no point going to the effort of finishing this downstairs area and furnishing it, only to have leaking pipes destroy everything. So as you can see, this has not been an easy and straight forward process and we have certainly learnt a lot during this time about older houses and the hidden costs that can come up when you buy a house of this era and type.
Study or craft area maybe?
We only had a very small renovation budget and most of it has been sucked dry with boring but essential things like drains, pipes and waterproofing. It is so much more exciting to spend renovation $ on great carpet or furnishings, it is painful to spend it on things that can't even be seen, but we will get there in the end. It just means we will have to be a bit more creative in making this space our own and just quietly, I am actually pretty excited about the prospect. :)

Saturday, April 14, 2012

Gender Neutral Nursery: Part Two

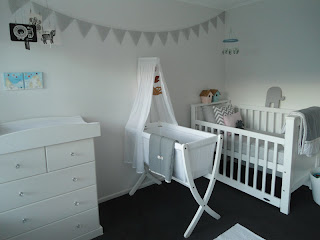
Just a few more snapshots of the nursery to share. We decided to forgo the change table this time around and went for a space saving option instead. We have had this white chest of drawers since Harry was born (my lovely Dad painted them for me) and they are a great size for a nursery.
I found a second hand Tesori change top which fits the drawers perfectly and hopefully will provide an efficient changing area, at least for the first few months. Although there isn't as much storage as a purpose built change table, there is a small area for nappies and wipes at the end.
My favourite rocking chair.
I have "borrowed" my favourite replica Eames rocker from another part of the house and it is now at home in the nursery, finished with another chevron cushion. :)
One of my favourite items is the mobile above the change table. I made this very simply with some Wee Gallery Art Cards which I found on Trademe, and a photo mobile hanger. These are bold black and white prints and I really love them.
Wee Gallery Art Cards.
Clothes and shoes are also a great inexpensive way to decorate your nursery. I found these baby Ugg boots for 99cents from Savemart and they look like they have never been worn. I know many people don't like buying second hand items but I love searching for little bargains and it is one of my favourite hobbies. I just wish I had more time to do it!
99 Cent Baby Ugg Boots!
I picked up a couple of these wooden grey elephant wall plaques for $1 each and they also fitted with the unisex theme well. The elephant motif is very popular in children's decor and it is quite easy to find bedding and other items in this theme if you wanted to take it further.
Creating a space for baby is such a fun part of the nesting process and whether it is a corner in your bedroom or a dedicated nursery, there is so much you can do to personalise it and make it fun.
My babies are in their own room from Day 1. We had every intention of sleeping them in their bassinets in our room (which is recommended) but after one night, we realised this wouldn't work for our family. We seem to have very loud little sleepers and we wake constantly with every sniffle and movement.
The nursery is only a few metres from our room and this arrangement works for us. Only a few short days before this new baby arrives and I am trying to relax as much as I can and enjoy the last few days of being a family of four. :)

Thursday, April 12, 2012

Gender Neutral Nursery: Part One

The room is ready for it's newest little occupant.
Well, after a final burst of energy I have finally finished pottering around in the nursery and created a new gender neutral place for the new little one to sleep. Knowing me, I will want to make changes as soon as I find out whether it is a boy or girl and for that reason, I really didn't want to spend much money at all on the room.
The birdhouses and my two home made cushions.
I looked around the house at what we had and apart from the Expedit cube storage unit and the cot, most things were either a Trademe or Op Shop find, or items we already owned from other parts of the house. The room was finished really inexpensively and I got to complete a couple of mini craft projects along the way.
Grey and white theme with a touch of pink and blue!
I love these little Charlotte and Austen pink and blue birdhouses which I found at Mary's Market a few months ago. They belong to Rosie and Harry but I have "borrowed" them from their room for the time being. You will also notice my grey chevron cushions made it into the nursery after all.
I love this Eeni Meeni Miini Moh wool blanket, a Trademe find.
I am a huge fan of Dwell Studio, a US based company selling high end linen, but needless to say, most of their range is cost prohibitive for me. When I stumbled upon a square dove patterned crib sheet set on Trademe which had never been used, I snapped it up, knowing it was the wrong size for our cot, but hoping I could use the fabric for something else.
The cot is now assembled.
As it turns out, one of the sheets fitted the cot perfectly so I have used that and out of the other sheet, I was able to make two cushions and the bunting flags you can see hanging along the wall.
Pink gingham cushion, courtesy of Rosie.
I love bunting and it is so easy to make. I didn't even bother sewing the flags, I just cut them out with a pair of pinking shears and sewed them to some plain white binding that I had cut off a new electric blanket we bought last year.
The toy box hiding in the corner...aka drinks tub from the supermarket!
The little toy box you can see peeking in the corner of the photo above is a plain white drinks tub which I found at Countdown for $10. It fits a lot, is lightweight and easy to carry to other parts of the house if need be. There is so much out there now and it is easy to find loads of great items for next to nothing. Part of the fun is in the finding!
Part Two to follow. :)

Saturday, February 25, 2012

Landscaping Lessons!

A few weeks ago I mentioned some of the landscaping madness going on at our house. It is still very much a work in progress but I thought I would share a couple of the lessons we have learnt recently.
The first lesson is: If a truck comes to deliver a large load of soil, it really isn't worth it to push them to drive through a small set of gates in order to dump the soil closer to your intended project.
This was unfortunately a lesson we had to learn the hard way. I have to say, I was dubious from the start but I am married to an optimist! There was literally 5cm to spare on each side of the truck but it had made it through.
All was going well until the large load was emptied, somehow causing the truck to no longer fit through the gates! I think it had something to do with the shift in weight after the truck was empty.
This marked the beginning of a very complex process to remove the truck and keep the fence and gate intact. The truck driver and Taff worked closely together and all was looking good...until the very last moment when we heard a crack. The truck had taken out the fence! This wouldn't usually be the end of the world but this fence is one of our pool boundary fences so we needed to address it immediately.
Thus began the search for a fence builder...and fast. This then led to landscaping lesson number 2: Do not try save money by choosing the cheapest quote you can find, you get what you pay for. The builders we went with were only a couple of hundred dollars cheaper than professional fence places and in hindsight, this is only a small amount in the bigger scheme of things.
The first day they were onsite was looking good, until after several hours of work they (and we!) discovered that the gates had been built wrong. The fence is on a slope and they hadn't taken this into account, instead building a completely straight bottomed gate, leaving a nice little gap for young children to crawl under and get into the pool area.
To their credit, they came back and finished the job and rebuilt the gates but Taff spent the last two hours "supervising" their work and asking them to redo things! Not one for confrontation, I chose to hide inside at this point. :)
So finally the new fence and gate were finished and after a couple of days of uncertainty, we actually quite like it now and think they did a reasonable job in the end. There is still much work to do to get it looking finished but we have plans to sand it and paint it further down the track. Still, it is functional and 100 times better than the old brown fence. In the end it was a good thing the truck smashed the fence as it accelerated a project that had been a very low priority prior to that. I am also sure this won't be the last lesson we learn in landscaping! :)

Monday, January 30, 2012

Landscaping Madness

Things on the blog have been quiet lately (sorry!) but there is a reason. We are in the thick of some much needed landscaping at our poor neglected house.
There has been major plumbing work going on downstairs as we are having our pipes replaced...here is some of the evidence laying on our drive way. :)
As is often the case, the interior has been our priority since we moved in and after making lots of cosmetic changes inside such as new carpet, polished floors and painting, etc, I guess it is fair to say that we ran out of steam...for quite a while. This is nothing unusual for us and sometimes several months can pass before we feel like tackling anything else.
Remnants of a large soil delivery outside the old built in BBQ...still not sure what to do with this area?
Our house is 50 years old and many of it's features are original, including most of the landscaping! There are lots of poorly positioned trees, overgrown patches of shrubs and weeds and pool tiling which has suffered from subsidence over the years.
Greenfingers couldn't collect our bag this month, as their access was blocked with rubbish and soil! lol
There is a lot of potential, BUT there is a lot of work to be done before we even get close to reaching that potential. Being seven months pregnant, I'm afraid I haven't been much help physically in the work being done outside for the last few weeks, but I have been very supportive and tried to keep a supply of snacks and drinks going for Taff as he toils outside in the rain and sunshine. :)
Clearing out the garden
We have had some high points and low points, which I may expand on at another time, but at the moment our property looks like a dumpsite. A couple of days ago I decided to walk around with my camera and snap some of the landscaping chaos that surrounds us at the moment, just to share with you. :)
Mini piles of rubbish, waiting for the skip to arrive
Taff has been slowly gathering piles of rubbish and green waste, strategically placed around the yard in anticipation of the large rubbish skip we plan to order for the coming weekend! I LOVE getting skips and there is something so satisfying about throwing out your rubbish and having it driven away a couple of days later. :)

This little pile has been here for about 18 months (blush)
We have had a family working bee, builders working on a new fence (I will share that story another time!), tiles being painted, new grass seed sown and tomorrow these ugly little babies (trees at the front of our property) will be gone forever as they face the chop from the experts! I can't wait to come home and see them gone, ready for the next project...a front fence and driveway gates.
Major tree work to start tomorrow!
In the meantime, enjoy the photos of all the mess. I am sure they will make you feel like your backyard isn't as messy as you once thought! lol. :)

Sunday, December 11, 2011

Kids Summer Bedroom Update: Part Two

Here are a few more snaps of Rosie and Harry's summer bedroom update. :)
A few months ago I got these cute little bird houses from Charlotte and Austen. They come in pink, blue and green. They add a touch of whimsy to the room and tie in with the bedding really well.
My favourite things in the room are the cushions...
the bunting...
and the blue and white striped rug which also helps to tie everything together.
One of the biggest jobs to tackle in the room was the merging of the contents of two sets of drawers and two wardrobes.
This took quite some time to do, but it was a great opportunity to go through everything and make a pile for the clothing bins!

The kids were so excited to see their new space and all the work we put into it that weekend was worth it when we saw how chuffed they were.
It is onwards and upwards now and the next project to tackle is a unisex nursery for the new little one!